
Build Your First Set App Using MVVM and RxSwift
Summary: In this post we’ll walk through building your first Set app in four parts. Part I will introduce you to the MVVM app architecture. Part II will demonstrate the SetSDK setup procedure. Part III will apply MVVM concepts to creating the scaffolding for your app. Finally, in Part IV we’ll use the SetSDK to display departure and predicted destination in real-time throughout the day.
The source code for this project can be downloaded from the Set Gitlab repo.
The Set SDK allows any developer to integrate machine learning and user behavior forecasting into their own applications with a simple a pod install. The first SDK release focuses on user location, answering the questions: Where are they now and where will they go next?
I want to provide a simple demo application that shows how to integrate the SDK into your own project and use some of the SDK’s functionality. While I’m at it, I’ll do it using an alternative to Apple’s MVC (Model View Controller) architecture, MVVM (Model View View Model), and one technology that enables MVVM called RxSwift.
Part I. MVVM Overview
There’s plenty of information out there about why the MVC design pattern becomes a headache, especially in more complex applications. MVC puts too much responsibility on the view controller. There’s very little separation of concerns. In the following diagram, you see the view and model mainly just exist without doing much of anything, while the view controller is responsible for updating and receiving updates from both the model and view as well as any business logic, database access, networking and more.

In a complex application, a view controller can grow to be thousands of lines of code, and very hard to maintain.
MVVM is a simple addition to MVC and simplifies the role of the view controller:
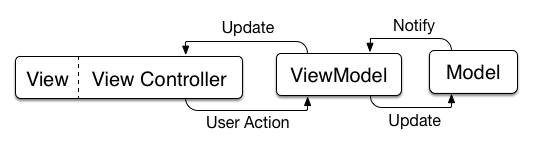
For each screen or view controller in your app, we introduce one additional file, the view model. The view model is responsible for interacting with model data, and applying business logic and display formatting to that data. The view model may also utilize database or network abstractions. The formatted data is made available to the view layer of your app, usually through simple properties, RxSwift Observables or a similar technology (more on that later).
The new role of the view controller is to simply ‘bind’ the data exposed by the view model to the view, usually using tools provided by something like RxSwift. The view controller also handles user interactions like button taps and gestures, notifying the view model of those events. In this way, the view and view model are tightly coupled and can be considered a single functional unit.
MVVM creates a more clear separation of concerns. It removes business logic and data formatting from the view layer and creates view models that are easily tested with unit tests. Much of the app can be tested in a ‘headless’ manner (without any views) while the views can be tested using more suitable tools like Xcode UI tests. This results in an app with fewer bugs that is more easily maintained.
Part II. Starting a SetSDK App
To launch the SetSDK, you’ll need client credentials for your app. We’re currently working on a self-service developer portal where you’ll be able to create these credentials, but for now email [email protected] and you’ll receive your credentials via email.
The SetSDK is distributed using Cocoapods. If you’re unfamiliar with it, check out their website with plenty of great documentation about how to get started.
Create a new Xcode project using File > New > Project… > Single View Application. I’m calling mine MVVMSetSDK. Once the project is created, close it and navigate to the root directory of the project on the command line.
Initialize Cocoapods by running pod init. Open the newly created Podfile for editing and add the SetSDK dependency to it:
Close the Podfile and run pod install. Cocoapods will create a Xcode workspace, called MVVMSetSDK.xcworkspace in my case, and install SetSDK and it’s dependencies. Open the newly created workspace in Xcode, and let’s get to building our app.
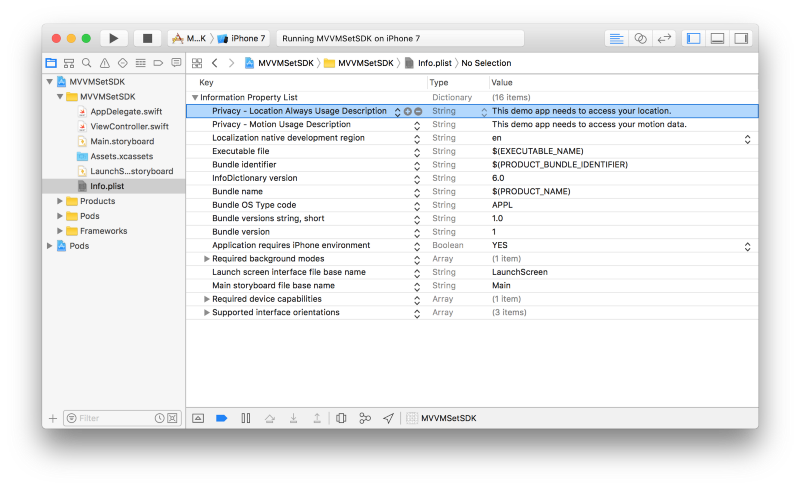
As described in the SetSDK documentation, we need to enable the Location updates Background Mode,

and provide Info.plist strings that are displayed to the user when we ask to use their location and motion data.
Part III. MVVM Scaffolding
Basic Design
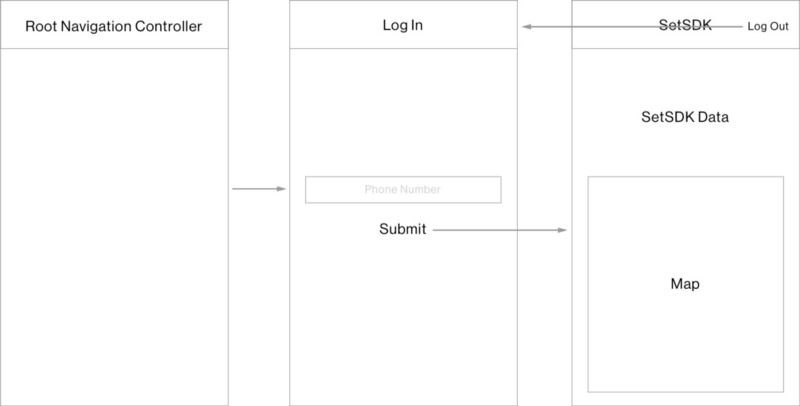
The design of our app will dictate the types of view controllers and view models we create, and will determine how those view models communicate with each other. For this app, our root view controller will be a UINavigationController. This navigation controller’s view model will be responsible for creating child view models that correspond to child view controllers that will be pushed onto the navigation stack. We’ll have two child view controllers, one for user login and one for displaying some data from the SetSDK after the user is logged in:
Creating the Root View Controller and View Model
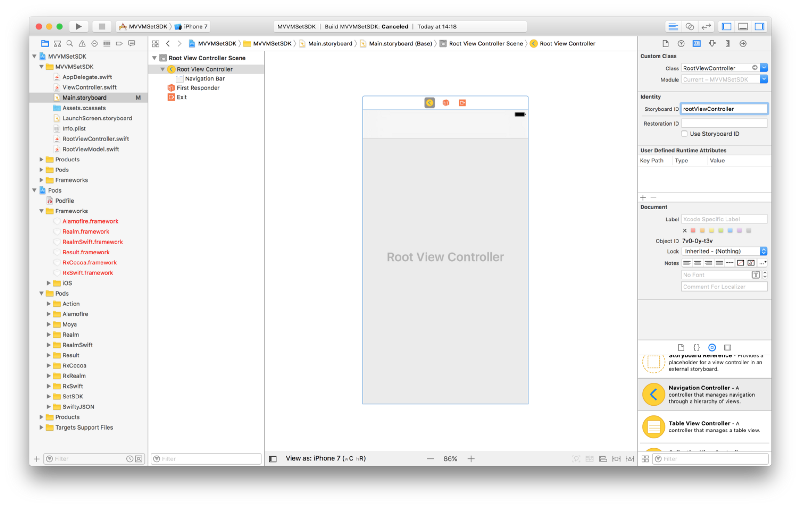
Start by opening Main.storyboard and deleting the automatically created view controller you see in there. Next, drag in a UINavigationController and give it a Storyboard ID of rootViewController. You can delete the automatically created UITableViewController that is set as the navigation controller’s root view controller. We’ll be creating our own soon. Your storyboard should look like this:
Next, create two new Swift files in your app, RootViewModel.swift:
and RootViewController.swift:
Make sure RootViewController is a subclass of UINavigationController. We’ll add a property to reference the view model. In MVVM, view controllers always own their view models, and view models know nothing about view controllers. We’ll make sure our viewModel property is set next.
Go ahead and set the Custom Class of the UINavigationController in our storyboard to RootViewController.
View Controller Creation
Our style of MVVM relies on having an easy way to create the appropriate view controller for a given view model. For a simple app like this, we’ll create a Swift file called Globals.swift that contains a function that creates the correct view controller for the provided view model, sets the viewModel property of the view controller to the provided view model instance, and then returns the view controller:
We’ll add additional switch cases to this function as we add more view models and view controllers to our app. For a more complex app, you’ll want to come up with a better way of maintaining this mapping between view models and view controllers, perhaps using a factory pattern or protocol.
Let’s update our AppDelegate to create and set our app’s root view controller based on our RootViewModel:
Above, we’re manually creating our AppDelegate’s window, and setting it’s rootViewController using our global function that maps our view model to a view controller.
Navigation as Business Logic
View controllers and views should be ‘dumb’; they know nothing about how they’re presented and dismissed, and they don’t know what screen was presented previously or which screen should be presented next.
One important concept in the flavor of MVVM we use at Set is that app navigation is related to business logic and should be handled by the view model layer. In that scenario, view controllers and views should be ‘dumb’; they know nothing about how they’re presented and dismissed, and they don’t know what screen was presented previously or which screen should be presented next. View models keep track of that and make navigation decisions based on the business logic and data they contain.
We’ll add some code to our RootViewModel and RootViewController to achieve this.
RootViewModel:
RootViewController:
We’ve introduced a couple RxSwift concepts here and are seeing our first use of data binding between view controller and view model.
Observable
The first thing to understand is RxSwift’s Observable class. An Observable represents a series of strongly typed values that occur over time. This series of values can be transformed with functional operators like map, flatMap, filter, and many more. Code that is interested in the values being delivered by an Observable can use the Observable.subscribe() function to receive values as they occur, or can use one of the many RxCocoa (an extension to RxSwift for UIKit binding) operators to bind an Observables directly to UIKit views. There’s so much to know about Observables so head over to the RxSwift documentation to learn more.
Modeling Navigation in the View Model
In RootViewModel, we created the enum NavigationStackAction that represents the different navigation actions we may want to apply to a UINavigationController(RootViewContoller in our case). Then we added a BehaviorSubject property to the view model that will expose a series of NavigationStackActions to RootViewController. BehaviorSubject is an extension of Observable that allows you to programmatically send values using BehaviorSubject.onNext(element:). It also has the convenient behavior of delivering the last (or current) value to any new subscribers. For now, the BehaviorSubject is initialized with a .set NavigationStackAction containing an empty array of view models.
Binding to the View Model’s Navigation Data
In RootViewController, we override viewDidLoad() and subscribe (bind) the view controller to the view model’s BehaviorSubject of NavigationStackActions. Within the subscription closure, we examine the type of NavigationStackAction and modify the navigation stack appropriately. Notice our global function to map view models to view controllers is used to create the view controllers that are added to the navigation stack.
Important note: To prevent retain cycles and assure that subscriptions are disposed of upon deallocation of RootViewController, we added [weak self] to our subscription closure’s capture list and added the Disposable returned by Observable.subscribe() to a DisposeBag that is stored as an instance property of our view controller. Like I said, lots to learn. See the documentation here.
We’re now in a position where we can control app navigation from the business logic contained in RootViewModel. Now let’s create some view model/view controller pairs to navigate to.
Creating the Login Screen
We’ll keep the login screen very simple. It should contain a text field for the user to input their 11 digit phone number, and a button to submit the form. We’ll verify it’s a 11 digit number and then use it as our user id to launch the SetSDK. In a real application, you’d obviously want to use actual authentication to identify your users.
Let’s start by creating the view controller in Main.storyboard and give it a Storyboard ID of loginViewController:
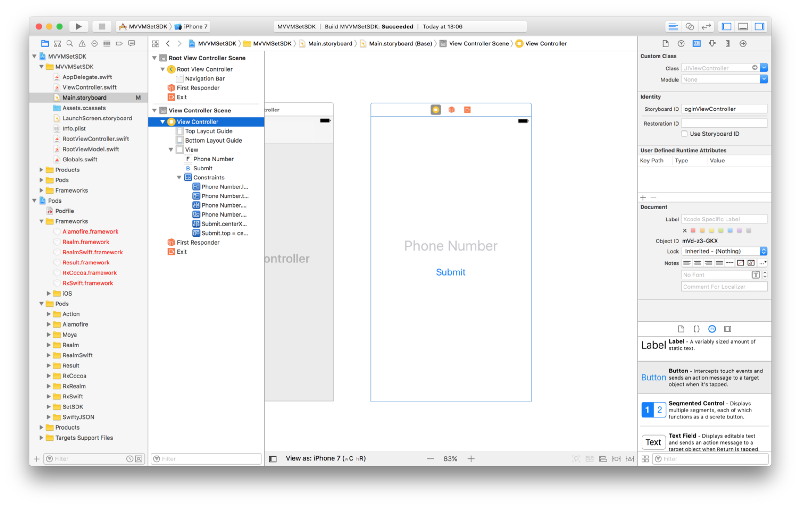
Next, we’ll create two new Swift files for LoginViewModel:
and LoginViewController:
Be sure to set the Custom Class of the login view controller you created in Main.storyboard to LoginViewController and wire up the @IBOutlets.
Let’s add the appropriate switch case to our global viewController(forViewModel:) function:
UpdateRootViewModel by initializing our navigation stack with the login view model:
Another important concept in the style of MVVM we use at Set is that view models create and manage other ‘child’ view models, mirroring the parent/child relationship between nested view controllers in an app. Parent view models can observe or query the child view models they create, but child view models know nothing of their parent. In the code above, RootViewModel is the parent and LoginViewModel is the child.
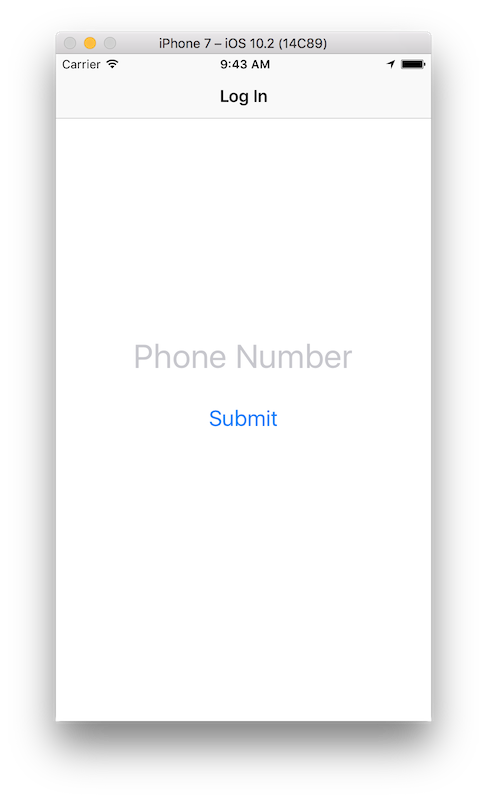
Run the app now, and you should see the login screen appear:
Let’s add some behavior to the login screen. I want the Submit button to be disabled until the user has entered an 11 digit phone number. When the submit button is tapped, we’re going to fake a real authentication process, and notify the RootViewModel that the user has successfully logged in.
Let’s walk through the above LoginViewModel code.
First, we use a RxSwift Variable to keep track of the phone number entered by the user. Variables represent a value that can change over time. You can ask for the current value, or convert the Variable to an Observable to subscribe to changes.
Then we created an Observable called phoneNumberIsValid that will send false until the phone number is exactly 11 digits long. This is done by converting the phoneNumber Variable to an Observable and mapping it to true or false depending on if the phone number matches a regular expression.
Lastly, we create a simple submit() function that will be called when the user taps the Submit button. It doesn’t do anything yet, but we’ll get to that soon.
Next, we’ll modify LoginViewController and bind it to LoginViewModel.
Here we used RxCocoa’s UIKit bindings to bind the text field’s current text to the view model’s phoneNumber Variable. As the user enters new text, the phoneNumber Variable is updated in real time.
We bind the isEnabled property of our button to the view model’s phoneNumberIsValid Observable so the user can only tap the submit button when there is a valid phone number entered.
Lastly, we bind button taps to the view model’s submit() function.
Even in this oversimplified example, you can see the benefits of MVVM and RxSwift. Our code is clean and concise. There is good separation of view and business logic. We’ve added fairly sophisticated behavior to our view controller with just a few lines of declarative code, and we did all this with none of the delegate, target action, or NSNotification patterns we usually see in iOS.
Communicating With the Parent View Model
Sometimes certain user actions or events will be handled in the view model that initially receives them. Other times, we may want to handle an event or action in some other view model higher up the view model hierarchy. As I mentioned before, a view model should know nothing about it’s parent view model, so how do we achieve this?
One solution is to create a PublishSubject on the child view model (PublishSubject is similar to the BehaviorSubject we used earlier, but doesn’t send the most recent value to new subscribers). The code in that child view model can simply send a data representation of the event or action that occurred by calling PublishSubject.onNext(element:). At the time the parent view model creates the child view model, the parent can subscribe to the child’s event PublishSubject and then respond appropriately as events are received.
Part IV. Using SetSDK
Handling Login and Launching SetSDK
I want the launching of the SetSDK to be handled in the RootViewModel, so the LoginViewModel doesn’t need to handle the login event, but we do need to let RootViewModel know about it.
Let’s modify LoginViewModel to send an event when the user successfully logs in by submitting their phone number:
I’m just showing the additions here. We created an enum LoginViewModel.Event to represent the events that occur, in this case, the user successfully logging in. We created the events PublishSubject that the parent view model can subscribe to, and the submit() function now sends the .loggedIn event through the events PublishSubject.
Let’s update RootViewModel to handle that event and launch SetSDK:
Be sure to set your Set client id and secret.
We refactored the creation of the LoginViewModel, wrapping it in a function were we create it and then subscribe to it’s Observable of LoginViewModel.Events before returning it. When a .loggedIn event is received, a private function is called to launch the SetSDK.
Using Our MVVM Tools
You’ve now seen the basics of how we use MVVM at Set.
We’ve covered MVVM architecture, navigation in the view model layer, creating specific view controllers for specific view models, binding view controllers to view models using RxSwift, and bubbling events from child view models up to parent view models, and responding to those events.
Once the SetSDK is launched, we now have the tools to create and navigate to a new screen that will display some output from SetSDK. Let’s create new files for SetViewModel and SetViewController(as well as it’s storyboard representation), and handle them in the Globals.swift view controller factory function. In RootViewModel, we’ll trigger the presentation of that screen in the SetSDK.launch() completion handler and handle a .logOut event from the SetViewModel as you can see in RootViewModel here:
Using SetSDK’s Functions
The SetViewModel will use two SetSDK functions. We’ll use SetSDK.onDeparture(from:eventHandler:) to receive a callback from the SDK whenever the user leaves a known place. Within the callback closure of that function, we’ll call SetSDK.getDestination(fromLocation:fromTimestamp:) to find out where the user is likely going next.
In SetViewModel, we’ll wrap the SetSDK function calls in RxSwift Observables to make it easy to bind the data to the UI. You’ll see it’s very easy to derive new Observables from existing Observables in order to create and expose additional data to the SetViewController.
We’ve created Observables to model the departure time, departure place name, arrival time, destination place name, and destination place location, as well as created a function to handle log out. Next, let’s bind the views of SetViewController to SetViewModel:
With all that in place, the SetSDK screen will display departure and arrival information from SetSDK and update in real time as additional departure callbacks are received from SetSDK.onDeparture(from:eventHandler:). The user can log out and return to the log in screen by tapping the Log Out button:

Looking Forward
It’s an exciting time at Set. We see a lot of potential to share some of the tools we’re working on, including a more structured version of the MVVM concepts I covered in this post. We’re moving quickly on adding new features and behavior forecasting APIs to our SDK. If you’re interested in experimenting with the SDK, please sign up for developer access and keep an eye on our blog for updates.
I hope you’ve learned some ways to improve your own apps by using MVVM, and that I’ve sparked some ideas about the powerful things you can do by adding SetSDK’s user behavior forecasts to your own apps. Thanks for reading!