
The definitive guide to publishing content on the decentralized web
Build a simple decentralized RESTful endpoint with minimal effort using IPFS/IPNS

You’ve probably heard IPFS referred to as the permanent web, or the immutable web. This is a big idea… an immutable store of all the world’s information. It all ties back to the idea of content addressing, which we’ve talked about before on this blog. To refresh your memory: the immutability of content on IPFS gives us nice things, like de-duplication of data (because the same content from different peers will produce the same hash address) and content verification (so we can be confident that content has not been modified if its hash matches what we were expected/requested). This means nobody can add malicious code on its way to my peer (no MITM attacks here). Here’s a great video that explains a lot about how the immutability of IPFS is implemented.
Now, a permanent or immutable web is all well and good, but it’s often not very practical for dynamic content. What about things that change like websites, blogs, social media, and well, pretty much all the services we currently enjoy on the web today? For that, we have IPNS, the Interplanetary Name System. So what IPNS let’s us do, is add immutable content, and then update a pointer to that content so that even though the underlying content might change, the way we link to it does not. This is essentially like a self-certifying file system, which maintains some of the niceties of content verification (you know you can trust my IPNS link because you can verify that I am the one that published it using my Peer ID) but adds the niceness of mutable references. This way, I can update my website without having to have everyone change the CID they use to access it. Nice!
So what exactly is IPNS? Basically, a global namespace based on Public Key Infrastructure (or PKI) which allows us to build trust chains (so you can follow a public key to its route peer), giving us encryption and authentication, and is still actually compatible with other name services. So for example, we can even map things like DNS entries, onion, or bit addresses, etc. to IPNS addresses. There are now several examples to do these types of things, so it works already.
Having said that, IPNS (like much of the decentralized web) is still a work in progress. It is still quite slow, and not all IPFS implementations (namely, the JavaScript version) fully support it yet (though there is actually a PR that should make it into the next release). But, it is usable in many contexts, so let’s start with a simple example right now…
Say I wanted to share information about myself with various (preferrably, decentralized) web-services? But, I want full control of this information, so that I know what information I’m sharing, and I can decide what I do and do not want various services to know about me. In other words, not how things work for the most part in our current centralized web. Anyway, to share this information programmatically, maybe I’d create a simple RESTful API for services to access? I’d include things like name, birthday, social media links, work info, etc., and probably serve it up as JSON or something. Now, I can already do this quite easily using IPFS: just add a JSON doc with the right info from my peer, and view it online.
vim json # Edit json file and save
hash=$(ipfs add -wq json | tail -n 1)
open "https://ipfs.io/ipfs/$hash/json"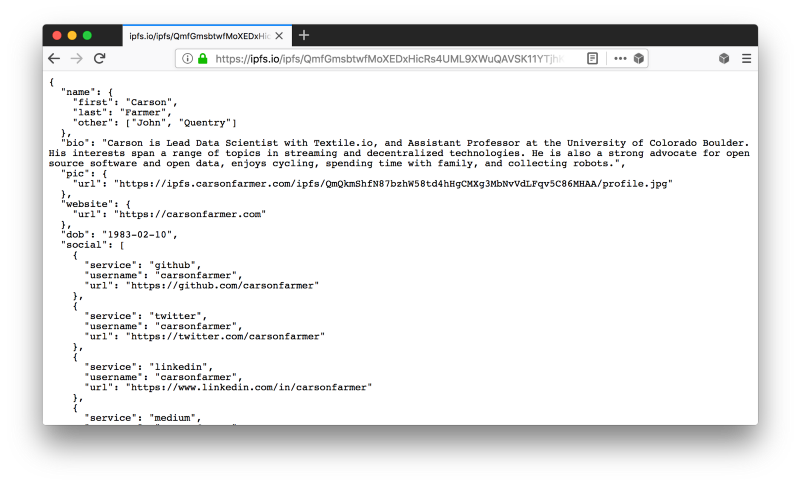
Here’s a template you can use (save it as json, without any extension). For the purposes of our example later, you might want to copy this one exactly, but substitute your own information. Easiest thing to do is fire up your favorite text editor, copy-paste the above text in, update with your info, save to “json” file. And then just run the last two lines of code in the previous code block to add and view over IPFS.
{
  "name": {
    "first": "first",
    "last": "last",
    "other": []
  },
  "bio": "something interesting",
  "pic": {
    "url": "https://i.stack.imgur.com/l60Hf.png"
  },
  "dob": "2018-01-01",
  "social": [
    {
      "service": "github",
      "username": "username",
      "url": "https://github.com/username"
    }
  ],
  "work": [
    {
      "title": "job title",
      "employer": "textile",
      "start": "2018-01-01",
      "url": "https://textile.io",
      "end": null
    }
  ]
}
Now, unfortunately, the immutability of this hashed file doesn’t quite cut it for a dynamic API. But, using IPNS, we can publish this hash to our PeerID (which obviously doesn’t change), and we can update the API response file as needed. Additionally, we now have an API response that can be authenticated and linked directly to us. Very cool, and requires only one extra command to accomplish.
ipfs name publish ${hash}Try making an edit to your JSON file and adding and publishing the file again. The IPNS link should (eventually) resolve to the new IPFS file hash. For added flexibility, you can also use different keys for different content and/or contexts. For instance, I could publish my API using one key, my website using another, and my buffy the vampire slayer fan fiction using yet another.
ipfs key gen --type=rsa --size=2048 keyname
ipfs name publish --key=keyname ${hash}
This is definitely a big improvement, but hashes aren’t exactly easy for humans to remember. There are lots of ‘solutions’ out there to address this, including url shorteners and things like that. But currently, one of the easiest solutions is to use a DNS TXT record on a domain that you control. Something that looks like this (where you replace ${hash} with your IPNS hash (probably your PeerID)).
dnslink=/ipns/${hash}Then, we can access it quite nicely at https://ipfs.io/ipns/your.domain.
I have my personal website registered with GoDaddy, so this is a screenshot of me creating a TXT record with a dnslink to my IPNS hash (Peer Id).

Now, when I visit https://ipfs.io/ipns/api.carsonfarmer.com/json, I’ll get my JSON API response. Super cool!
But, we can do better. This is still pretty messy, and frankly, if we want the average Web2 user of today to access my decentralized Web3 content with minimal effort, we don’t want them to have to deal with gateways and ipns/ipfs prefixes if they don’t have to. A major feeling of the decentralized web community is that the user experience shouldn’t change all that much — the transition should be transparent but easy — that’s how the decentralized web will win. Ideally, we’d like to get to something like this: https://api.carsonfarmer.com/json…
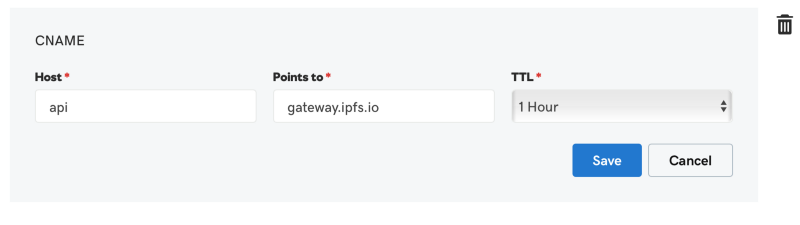
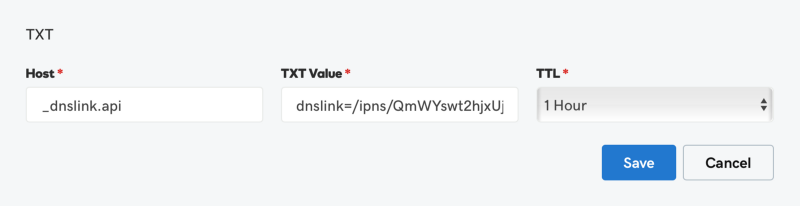
So, we can create an A record pointing our sub-domain to the IP address of an IPFS peer listening on port 80 for HTTP requests (such as any of the public IPFS gateways, or your own if you want). But we can do even better than this! Because we don’t want to rely on IP addresses being static, we can use a CNAME record to point at the DNS records of the gateway. That way, if the IP address changes, we’ll still point to the right place. Unfortunately, CNAME records don’t allow for other records (like TXT), but the fine folks at IPFS allow us to create a DNS TXT record for _dnslink.your.domain, which IPFS will look for.
So now, your GoDaddy (or whomever you use to register your domain) setup might look something like this.
Which produces something like this when you visit the custom url:
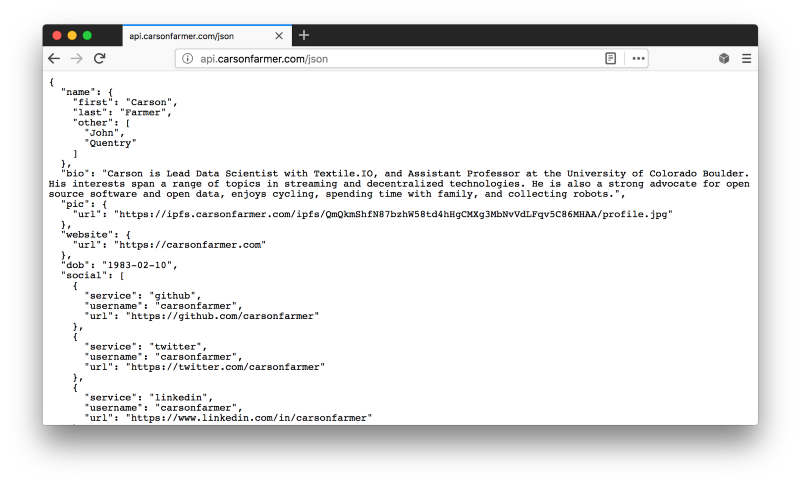
Now, isn’t that so much nicer! A normal Web2 url pointing to a futuristic Web3 resource… cool! So if you own your own domain, or manage one for your team or employer, you now have a relatively easy way to implement a mostly static API in a decentralized system.
Now go build something amazing and host it on the the decentralized web. Once you’re done, let us know what you built. In the mean time, don’t forget to check out some of our other tutorials, follow along with our Textile Build Developer Training series, and maybe signup for our Textile Photos wait-list.